Drag and Drop Form Fields – Formidable Forms
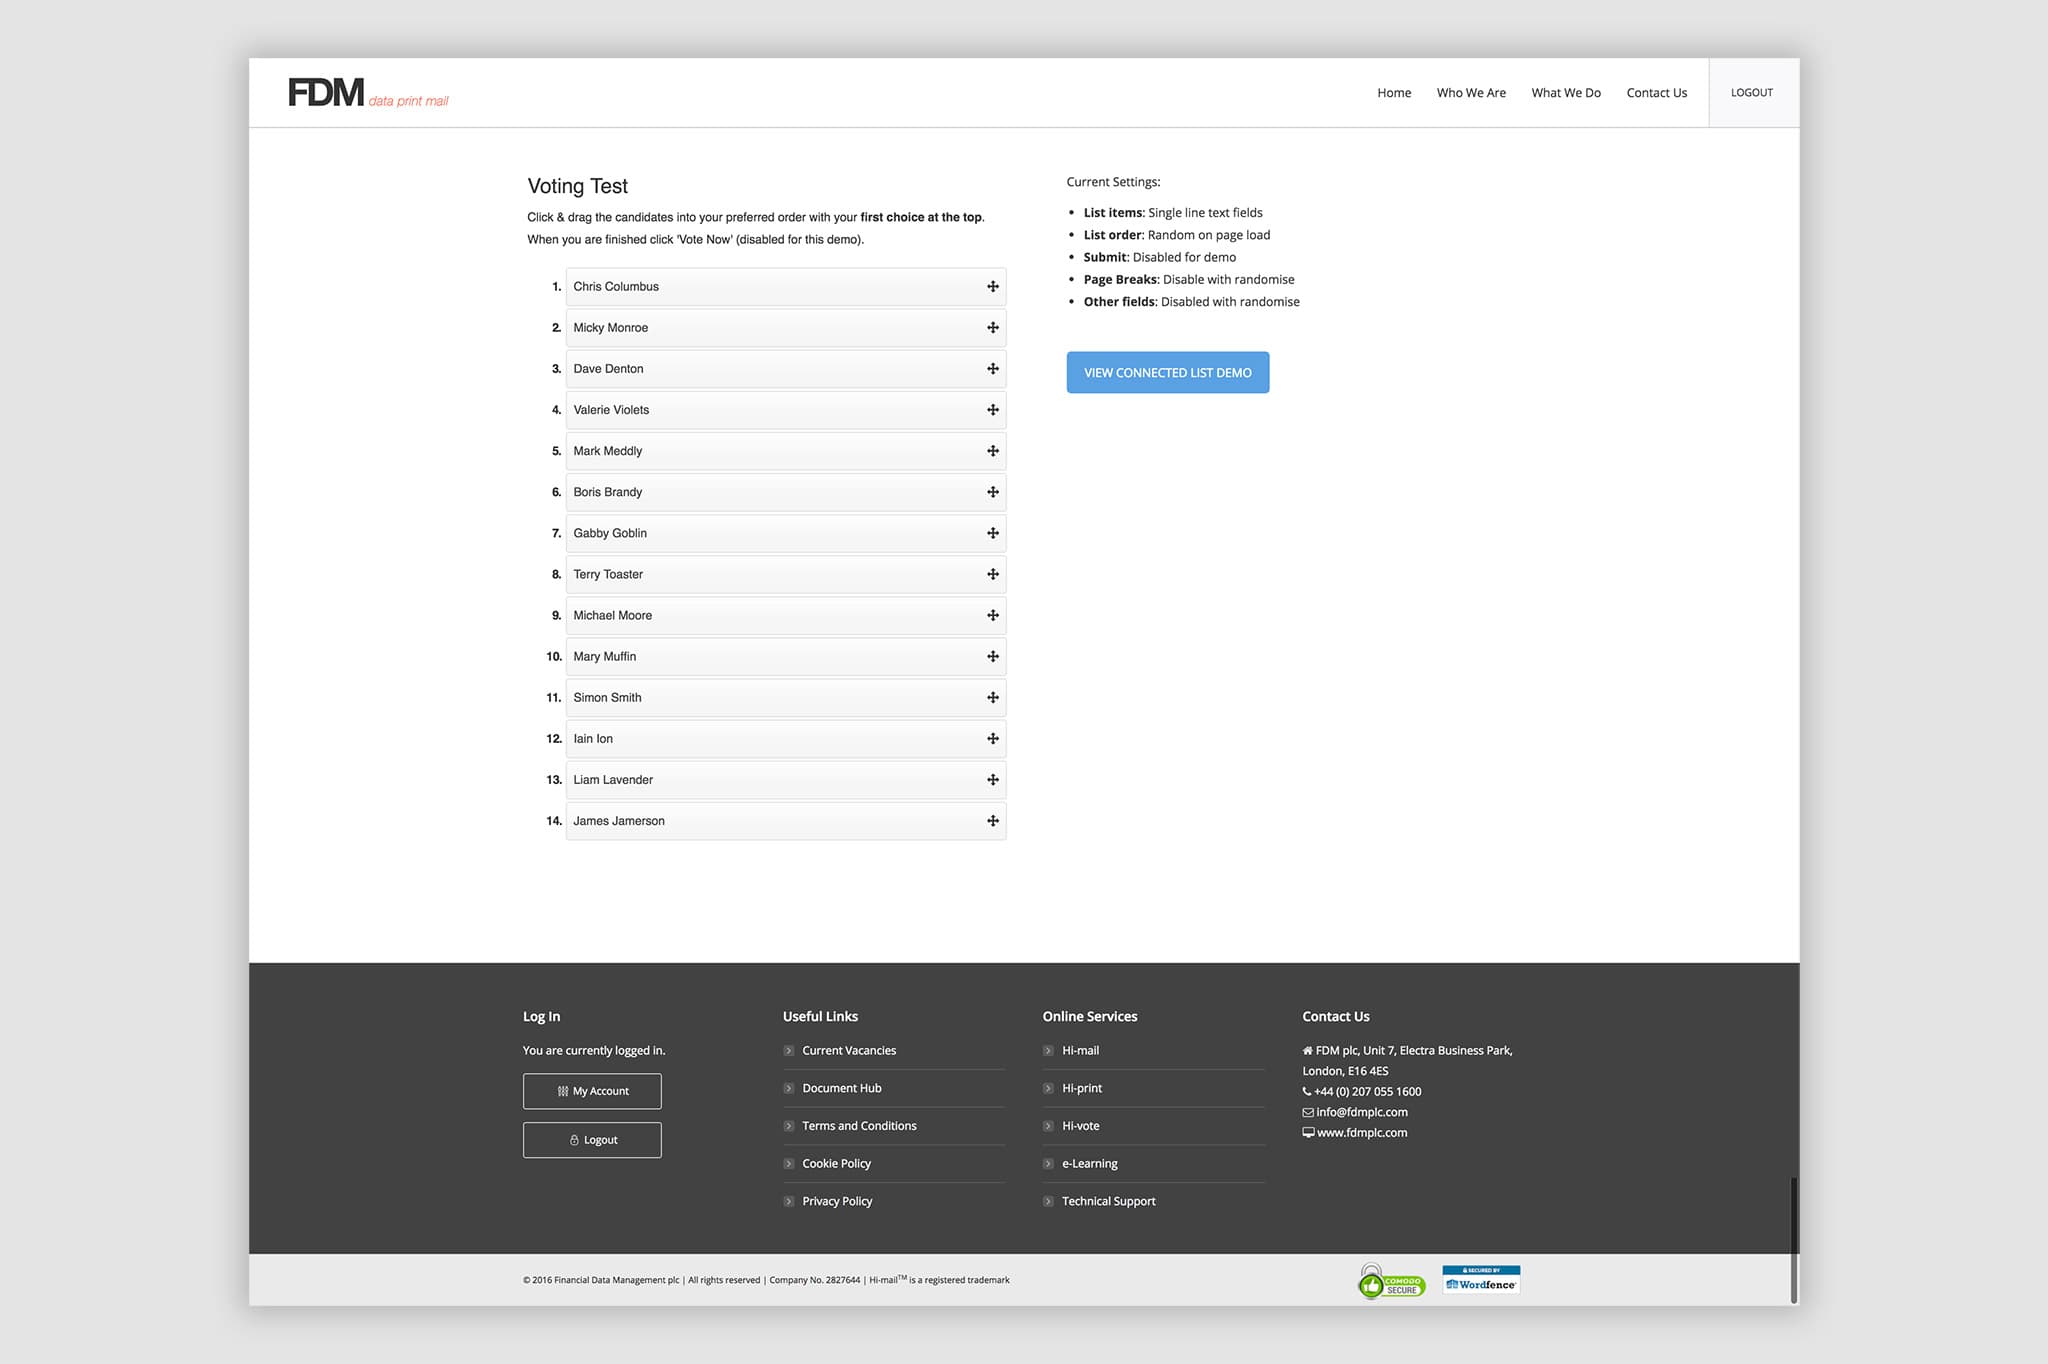
This Drag and Drop Form Fields demo was created using Formidable Forms and Single Line Text fields. A demo can be found below where you can click & drag the options into your preferred order with the first choice at the top.
Drag and Drop Form Fields: The problem
We needed to create a form with a list of options that could be re-arranged into a preferred order by my users. Making this process as simple and fool proof as possible was of very high importance.
Drag and Drop Form Fields: The Solution
The solution turned out to be relatively simple. Essentially all you need to do is call the jQuery UI Sortable script and convert each of the Single Line Text fields into list items (and do a bit of re-styling). Here’s now to do that:
Step 1: Create a new form
Create a new form and add 3 fields to it to start with.
- HTML: Call this something like “Start List” and leave the content blank
- Single Line Text: Give it a name and add a default value of 0 to it.
- HTML: Similarly to field 1, you can call this something obvious like “End List” and leave the content blank.
Step 2: Form Settings
- General: Amend as required. As far we’ve found none of these make any difference to the list.
- Form Actions: Nothing to do here.
- Customise HTML: This is where we’ll make the majority of the changes.
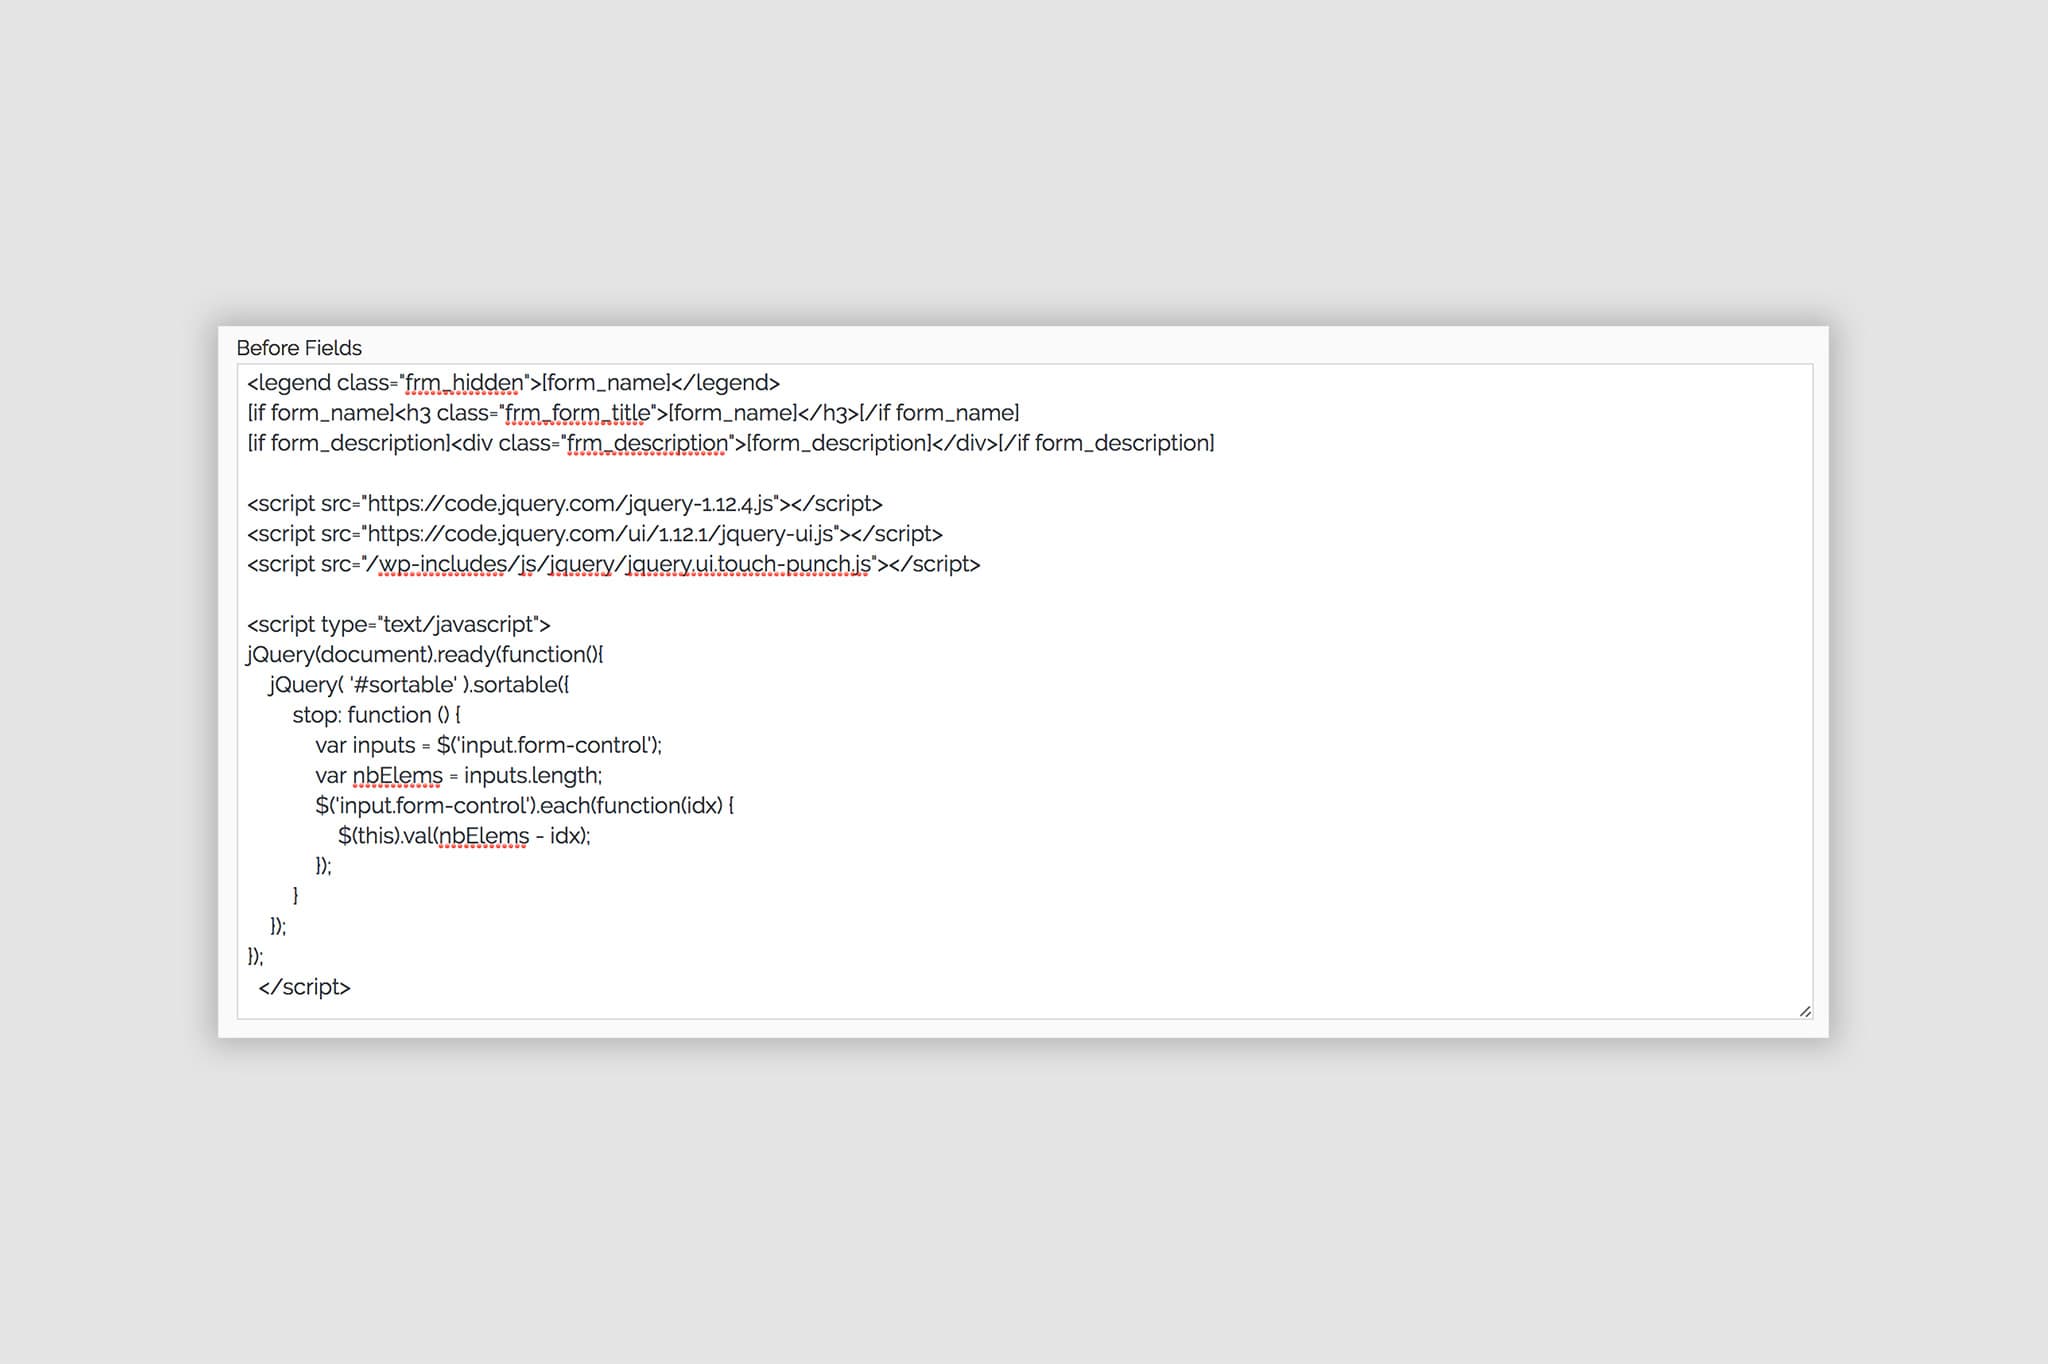
Before Field
In the BEFORE FIELDS section add the following:
<script src="/path/to/your/jquery.ui.touch-punch.js"></script>
<script src="/path/to/your/jquery-ui.min.js"></script>
And then underneath that add this:
<script>
	jQuery(document).ready(function ($) {
		$('#sortable').sortable({
			stop: function () {
				var inputs = $('input[type=text]');
				var nbElems = inputs.length;
				$('.ListContainer input[type=text]').each(function (idx) {
					$(this).val(nbElems - idx);
				});
			}
		});
	});
</script>
This script will do 2 things to your form once published:
- Call the jQuery UI Sortable script to make the ‘list’ sortable.
- Update the value of each of the single line text fields when they are placed in a new position.
Note: It’s probably worth mentioning that the above script applies the new values in REVERSE order as that was our requirement at the time of development. For example if you have 10 fields in your list, the field at the top will have a value of 10, then 9 and so on.
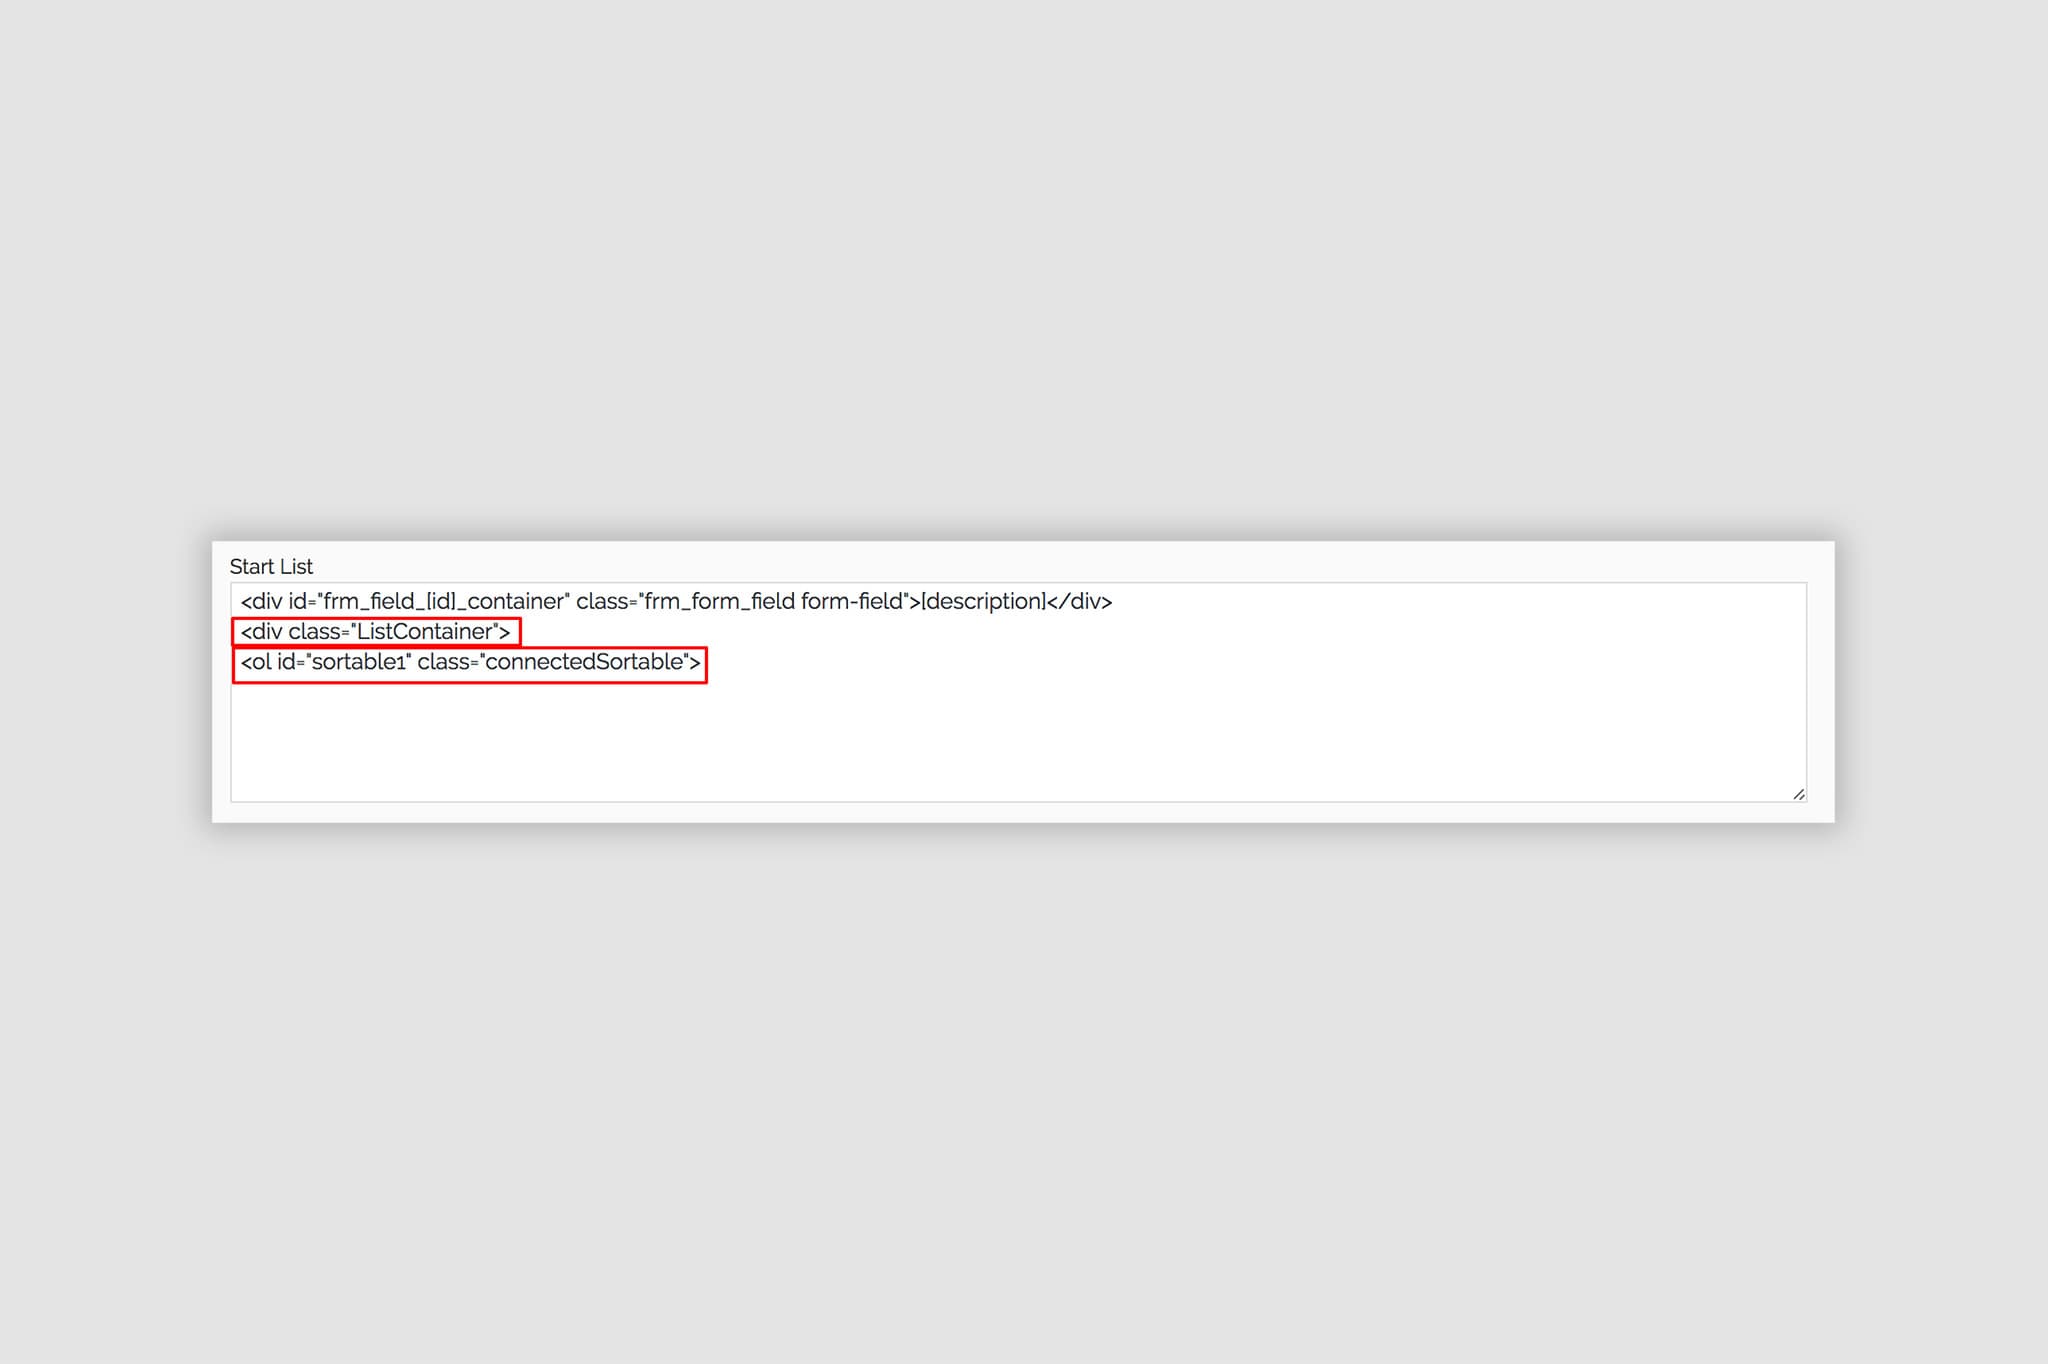
HTML Field
Then in the HTML field, under the code that’s in there currently, add this:
<div class="ListContainer">
<ol id="sortable">
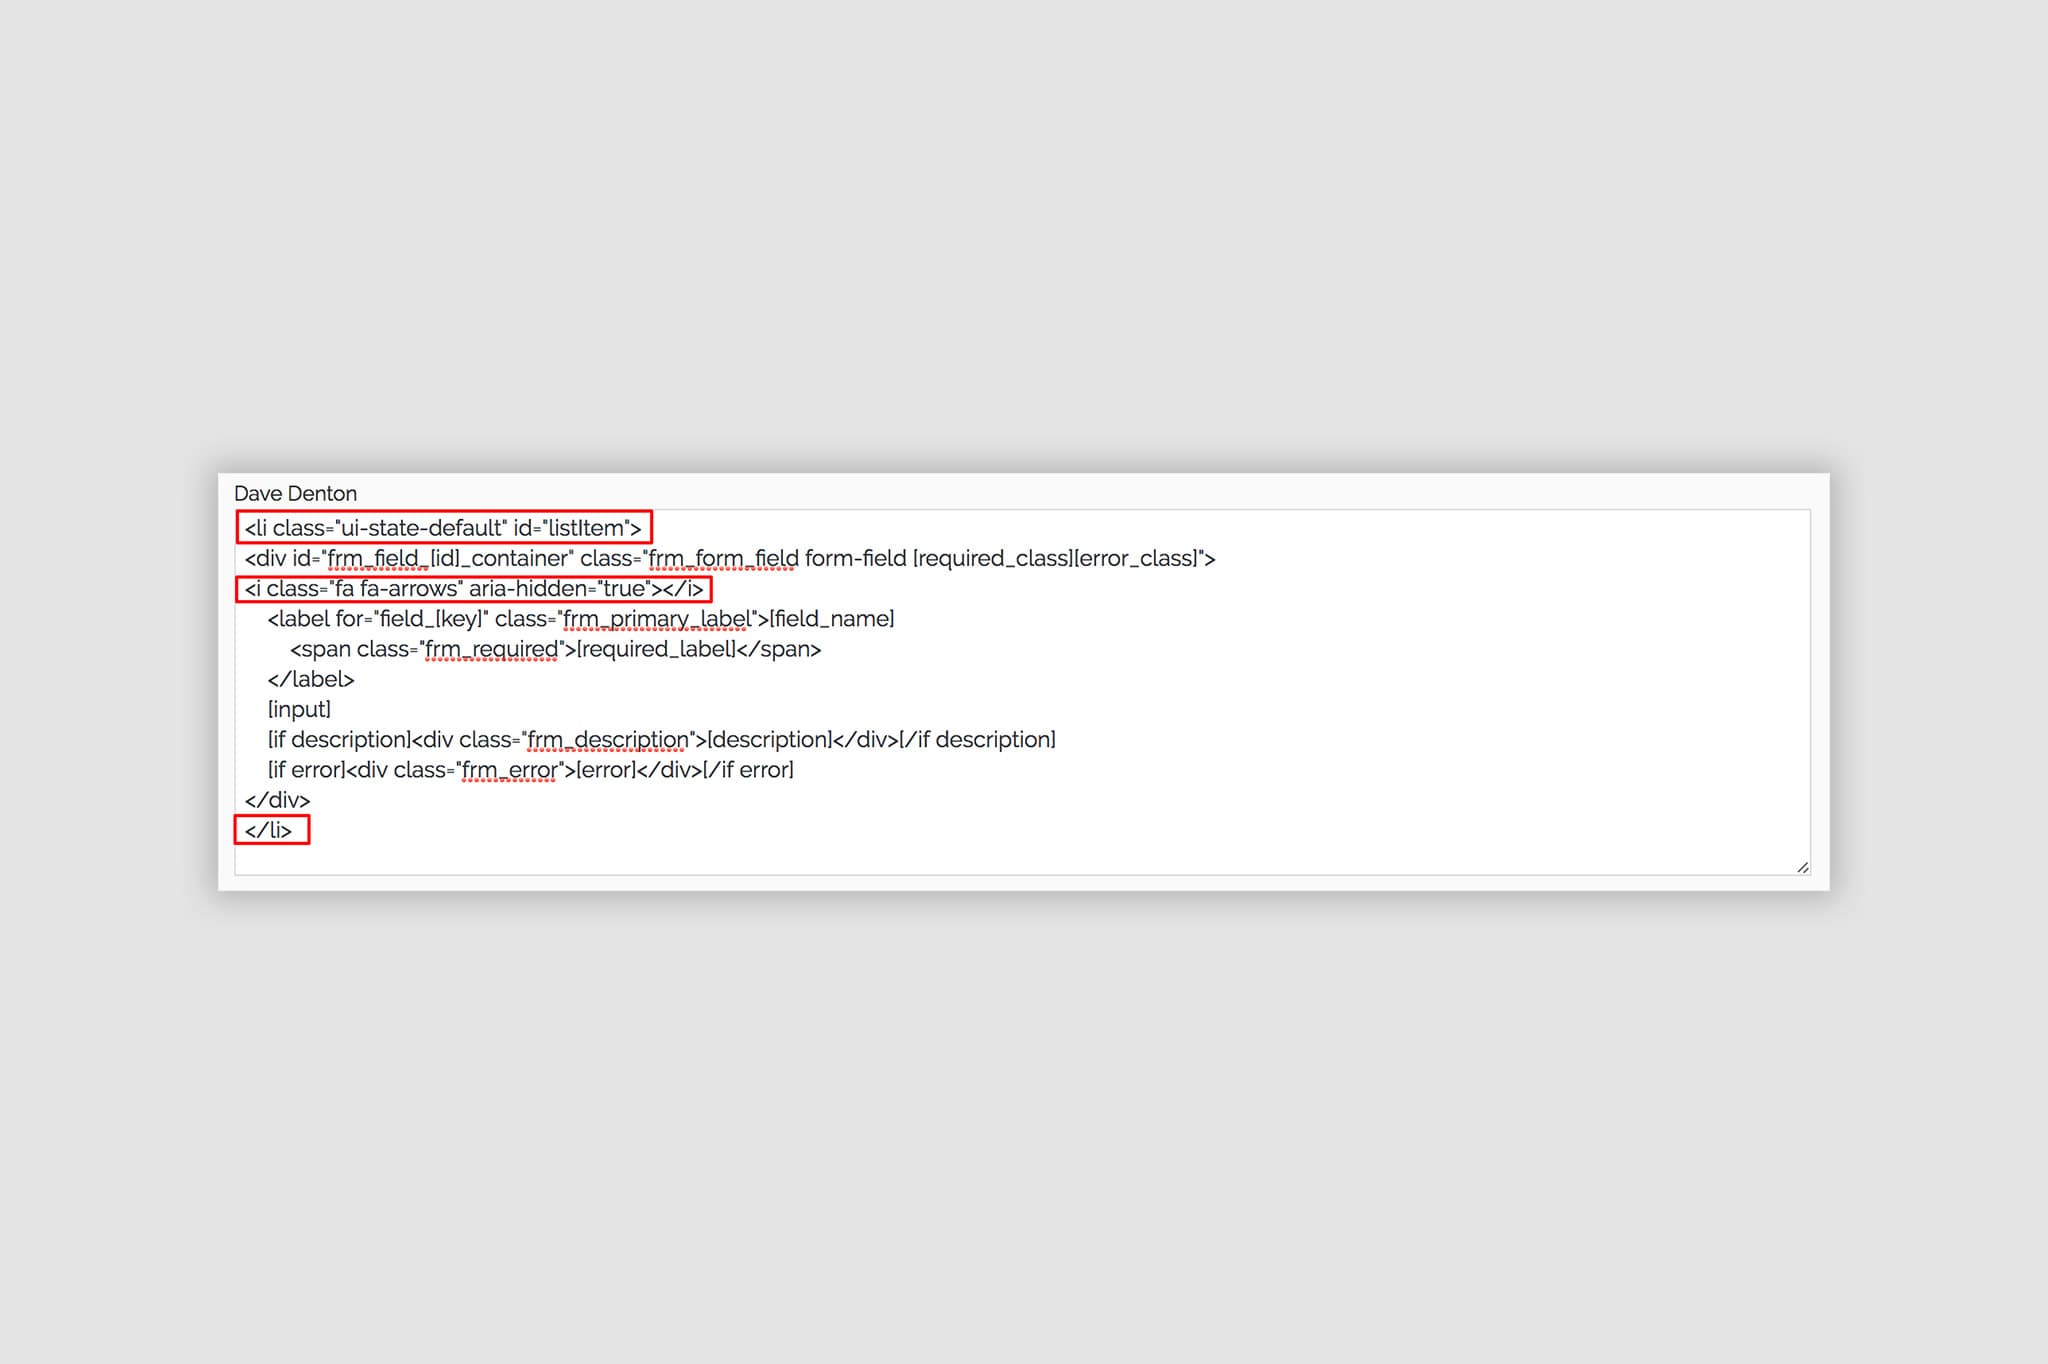
Now for the Single Line Text field…
You need to add this line BEFORE any of the code in the box:
<li class="ui-state-default" id="listItem">and then add this AFTER all of the code already in that box:
</li>You can also (optionally) add in this line to give the list items a nice icon to help show that they are intended to be moved around:
<i class="fa fa-arrows" aria-hidden="true"></i>This should be added just before this line: <label for=”field_[key]” class=”frm_primary_label”>[field_name].
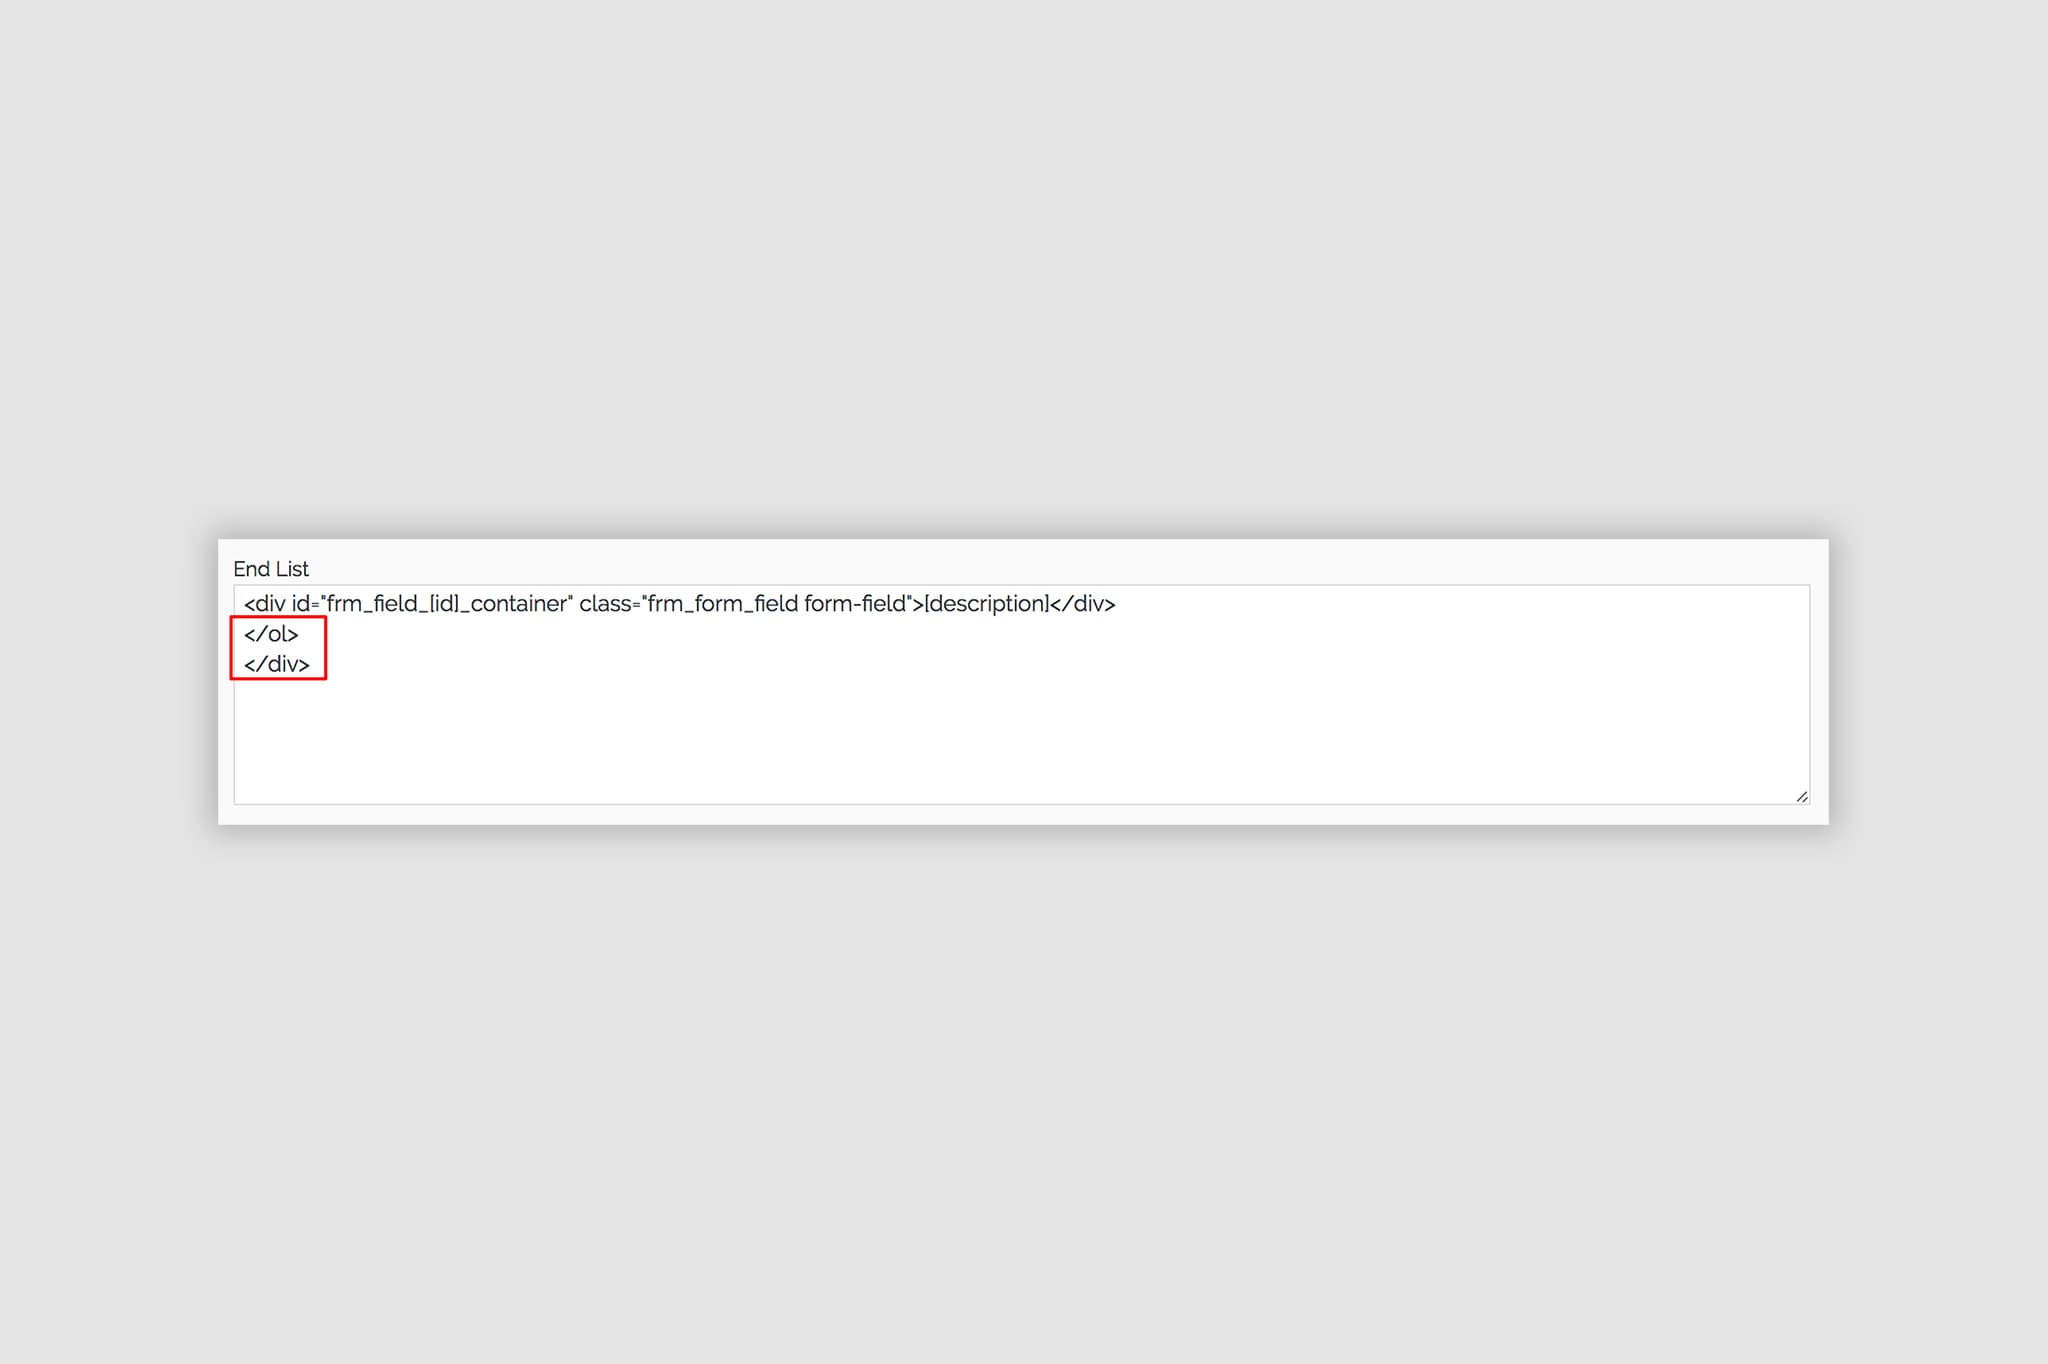
And lastly we need to add this to the final HTML Field:
</ol>
</div>
Now save your form.
You can now go back to the Form editor and duplicate the single line text field you have as many times as required to add more options to your list. Just make sure that you place the ‘End List‘ HTML field AFTER all of the single line text fields.
Now all that needs to be done is adding some additional CSS to hide the text input field and generally make it look a bit nicer. You will probably need to play around with this CSS to make it work with your WordPress theme or other custom Formidable Styles that you’ve created.
The CSS:
You may need to adjust this to suit your theme / website styling.
/* Sortable List CSS */

#listItem {
	cursor: move;
	padding: 8px;
	margin: 0px 0px 3px 25px;
	border-radius: 3px;
	height: 45px;
	color: #333333 !important;
}

.ListContainer ol {
	white-space: nowrap;
	overflow-x: scroll;
	overflow-y: hidden;
}

.ListContainer {
	overflow-y: hidden;
	overflow-x: hidden;
}


/* Hide the Text Input */

li#listItem>.form-field>.form-control {
	display: none !important;
}


/* Re-style the Text Input Field */

#listItem>.form-field>.frm_style_formidable-style.with_frm_style .form-field {
	margin-bottom: 0px !important;
}

#listItem>.form-field>.frm_primary_label.control-label {
	padding: 0px !important;
}

#listItem>.form-field>.frm_primary_label {
	max-width: 200px !important;
}


/* Field Drag & Drop Icon CSS */

i.fa.fa-arrows {
	float: right;
	margin-top: 6px;
}
Place that CSS on the page that your form is going to go. As much as possible i’ve tried to use custom ID’s to make sure that this CSS won’t effect any other forms you have on your site if you need to add it to the Formidable Custom CSS area or to your theme’s custom CSS area but make sure to test it out and make sure it doesn’t break anything by mistake.
And that’s it. It should look something like the screenshot below when you’re finished.
Optional Extra:
If required you can also combine this with the following code placed in a custom plugin or your theme’s functions.php file to randomise the order that fields will display on the page when it loads (as per the demo):
add_filter('frm_get_paged_fields', 'get_extra_form_fields', 10, 3);

function get_extra_form_fields($fields, $form_id, $error = false) {
	if ($form_id == 25) { //change 25 to the id of the form to change
		shuffle($fields);
	}
	return $fields;
}Note: Before you do this you will need to move the code in the HTML fields to the Before Fields and After Fields sections as they will also be put in at random positions and this will break everything big time. It also means that you can’t have anything else in your form.
Drag and Drop Form Fields: Summary
Hopefully this will help anyone who is thinking of using Formidable Pro to create a drag and drop form fields form and save you having to install another plugin.
If you liked this tutorial, visit our blog for more ways to improve your websites and workflow.
Enjoy.


