Create a Staff Timesheet using Formidable Forms
This article details how to create a basic staff timesheet using Formidable Forms, ideal for home or remote workers or anyone needing to record dates and times in an online form.
This article assumes that you are using the latest version of Formidable Pro and know how to add PHP snippets to your site. Along with a basic understanding of HTML and CSS.
The staff timesheet application consists of three key parts:
- A form for entering the dates and times worked
- A filter form for filtering the dates viewable (optional)
- A view for displaying the information
We built this application using the following steps:
Step 1: Build the initial form for our staff timesheet
Firstly, we need to create the entry form. The entry form consists of:
- A date field to capture the date being entered.
- 2 time fields to capture the start and end times.
- A text field to indicate the length of a lunch break. In this instance the time is fixed to one hour, so it’s safe to leave this as a read-only field but you can adjust as required.
- A toggle field to switch the annual leave status.
- A hidden field which will calculate the time worked for each entry.
Once we have the form we need to add a PHP snippet to our functions.php file, a custom plugin file or using the Code Snippets plugin.
We have edited to the snippet provided by the Formidable Team (found HERE) to include the lunch hour and remove this from the total hours worked:
/* Calculate Time Worked */
add_filter('frm_validate_field_entry', 'calculate_time', 11, 3);
function calculate_time($errors, $field, $value){
  if($field->id == 26){ //change 26 to the ID of the hidden or admin only field which will hold the calculation
    	$start = (strtotime($_POST['item_meta'][23])); //change 23 to the ID of the first field
    	$end = (strtotime($_POST['item_meta'][24])); //change 24 to the ID of the second field
$lunch = (strtotime($_POST['item_meta'][25])); //change 25 to the ID of the lunch hour field
    $totaltime = ($end – ($start + $lunch));
    $hours = intval($totaltime / 3600);
    $seconds_remain = ($totaltime - ($hours * 3600));
    $minutes = intval($seconds_remain / 60);
    //$seconds = ($seconds_remain - ($minutes * 60)); Uncomment this line if you want seconds calculated.
    $leading_zero_for_minutes = $minutes < 10 ? '0' : '';
    //$leading_zero_for_seconds = $seconds < 10 ? '0' : '';//Uncomment this line if you're including seconds.
    $totaltime = $hours . ':' . $leading_zero_for_minutes . $minutes;
    //$totaltime = $hours . ':' . $leading_zero_for_minutes . $minutes . ':' . $leading_zero_for_seconds . $seconds;//uncomment this line if you're including seconds
    $value = $_POST['item_meta'][26] = $totaltime; //change 26 to the ID of the hidden or admin only field which will hold the calculation
  }
  return $errors;
}
The above code will execute when the form is submitted and add calculate the numbers of hours worked and save it to the hidden field. This could also be done on the fly using JS if required.
Step 2: Build the Search form for our staff timesheet
We then created a new form that will act as a search and filter for our view. This is a very basic form containing 2 fields:
- A date field for the start date
- A date field for the end date
In the form settings we set the following options:
- Select “Do not store entries submitted from this form”
- Change the ‘On Submit’ option to ‘Redirect to URL’
- In the URL enter www.YourSite.com/YourView/?start_date=[551]&end_date=[552] and change 552 and 553 to the ID’s of your 2 date fields.
Step 3: Building Your View
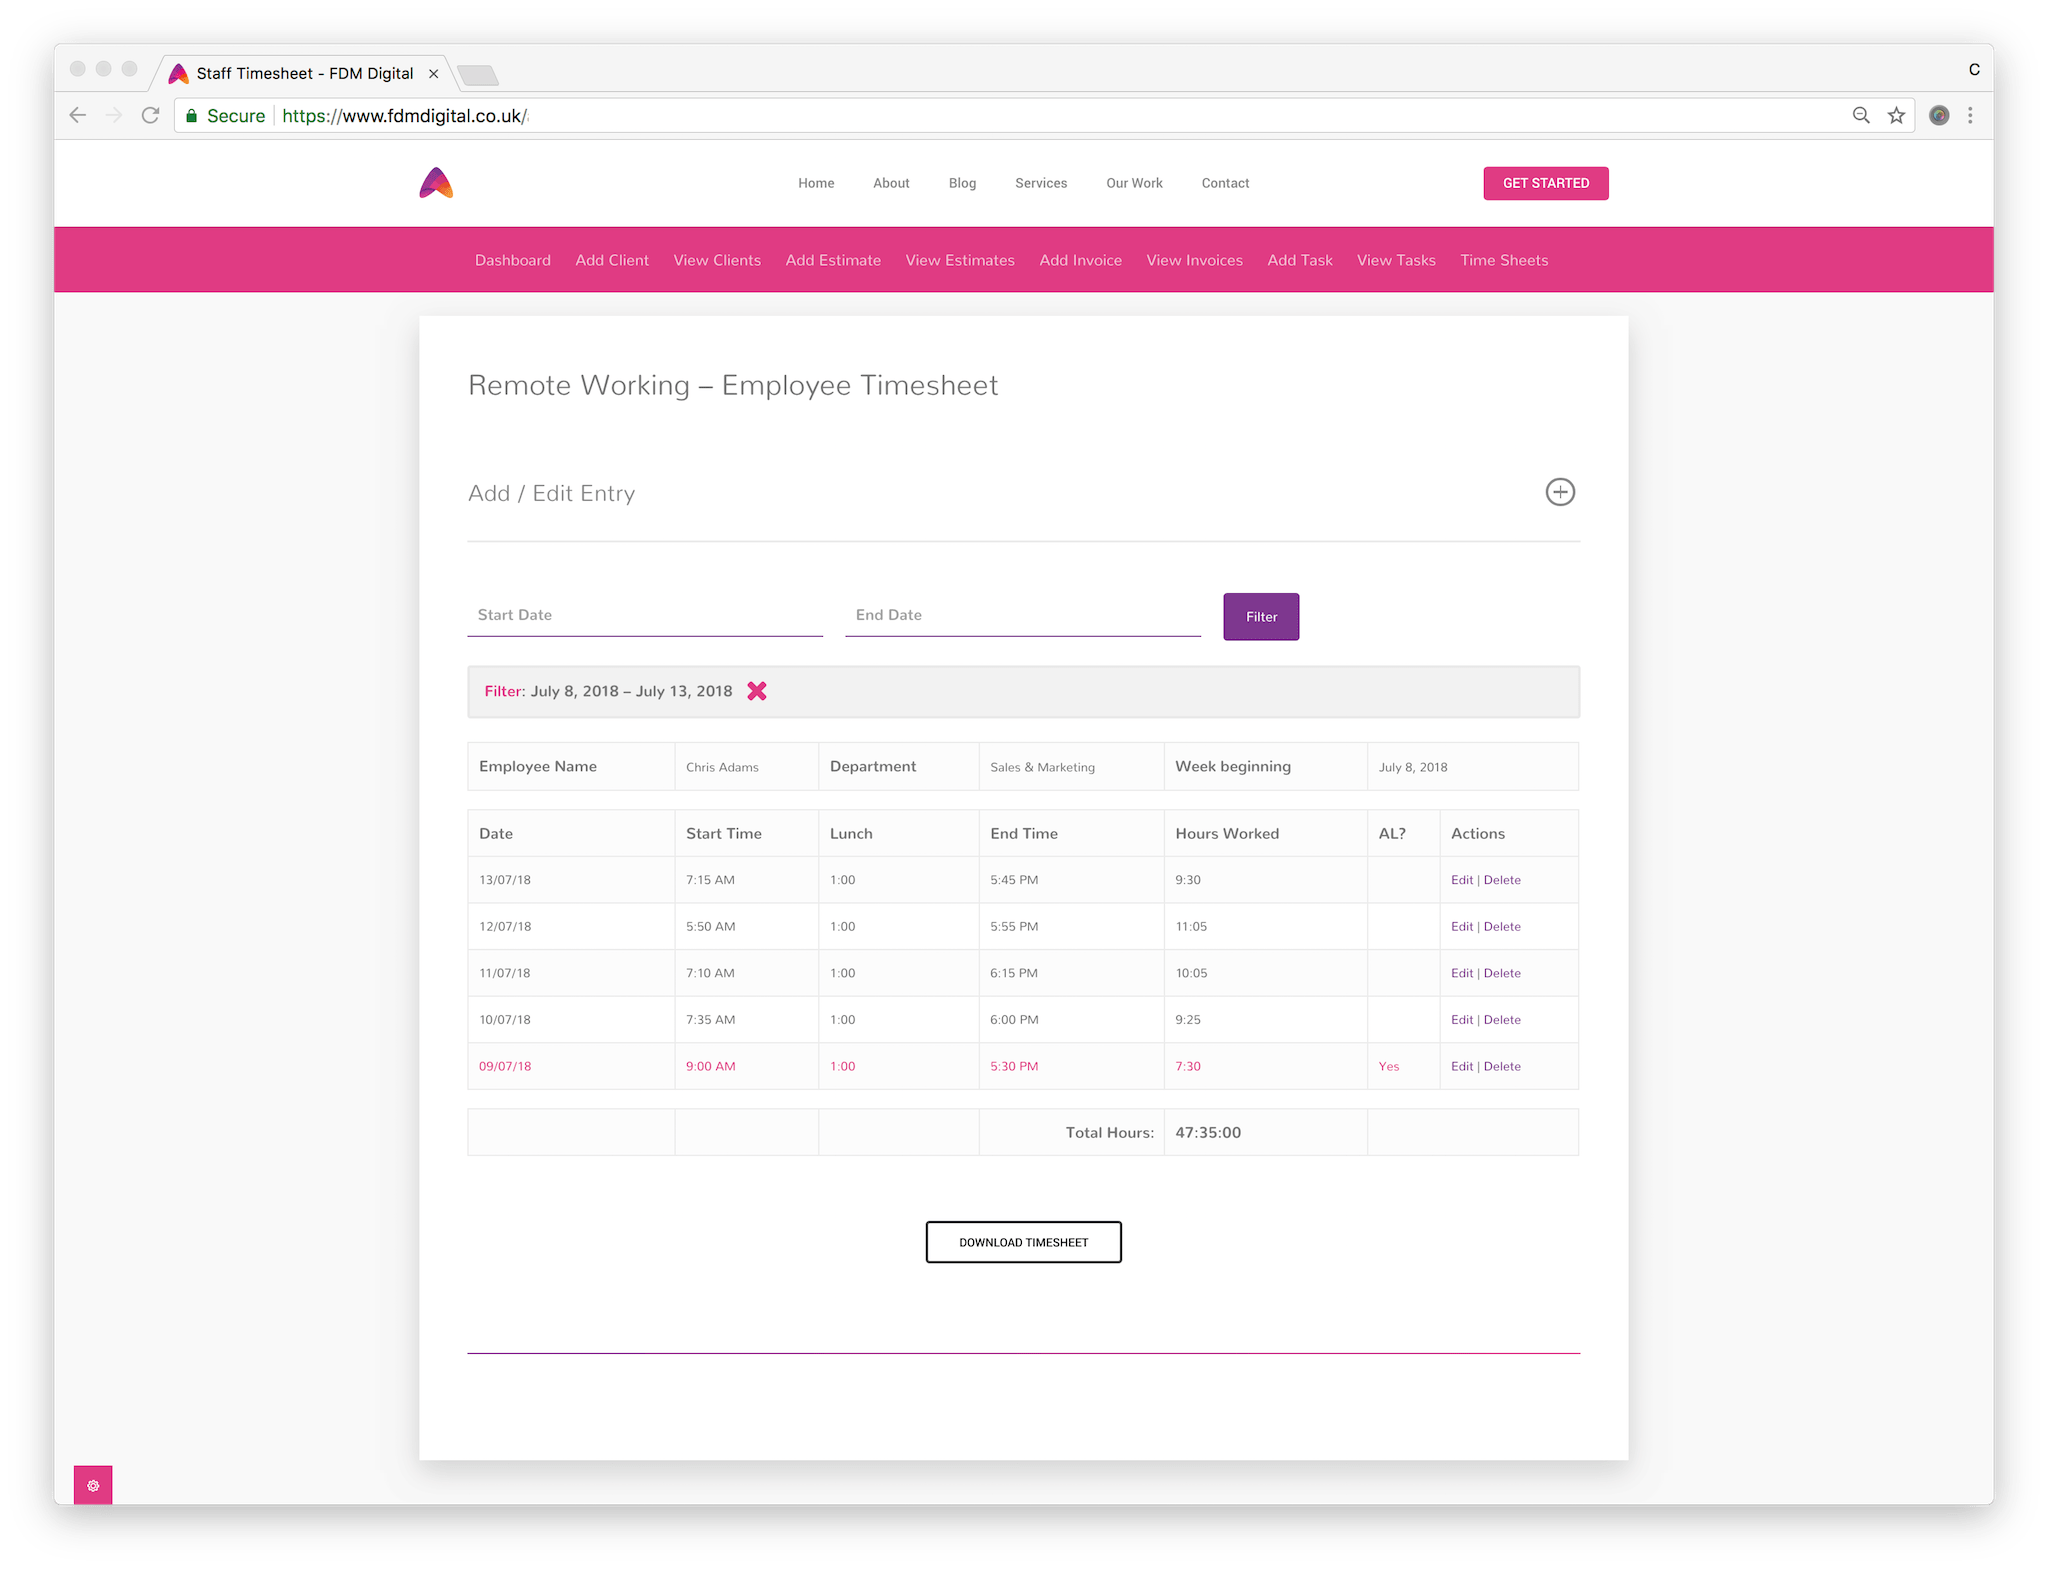
Now you can create your view which will display the hours worked. You may wish to create 2 views depending on your requirements as it may be useful to have 1 view for the employee to view their own hours and a 2nd view for Administrators to view everyone’s working hours.
In our view, under basic settings, we have selected Form 1 (our time sheet form) and ‘All Entries’ as the view type. Our view has been set up as an html table, but you may wish to build yours differently.
Adding a URL Parameter
We have also added an additional snippet to our functions.php file to allow us to use the ‘if_get_param’ variable and display page content based on a URL parameter. To do this please add the following script to your functions.php file, a custom plugin file or using the Code Snippets plugin.
/* Add Formidable Get-Param Shortcode */
add_shortcode('if_get_param', 'check_get_param_value');
function check_get_param_value( $atts, $content="" ) {
    if ( ! isset( $atts['name'] ) || ! isset( $atts['value'] ) || ! isset( $atts['type'] ) ) {
        return $content;
    }
    $type = $atts['type'];
    if ( $type == 'greater_than' ) {
        $type = '>';
    } else if ( $type == 'less_than' ) {
        $type = '<';
    } else if ( $type == 'equals' ) {
        $type = '==';
    } else if ( $type == 'not_equal' ) {
        $type = '!=';
    }
    $get_value = isset( $_GET[ $atts['name'] ] ) ? $_GET[ $atts['name'] ] : '';
    if ( ! FrmFieldsHelper::value_meets_condition( $get_value, $type, $atts['value'] ) ) {
        $content = '';
    }
    return do_shortcode( $content );
}
This will then allow you to use the following shortcode. For more information on this please click HERE:
[ if_get_param name="Whatever" type="not_equal" value="" ]Your Content Here[ /if_get_param ]Adding a search filter to the view
Then, in the ‘Before Content’ section we have added the following code:
[ if_get_param name="start_date" type="not_equal" value="" ]
<div class="filter"><span style="color: #e03c83;">Filter</span>: [ get param="start_date"] - [ get param="end_date"]<a href=” www.YourSite.com/YourView/”>Clear Filter</a></div>
[ /if_get_param ]
This shortcode will display the content of the search filter and provide a ‘Clear Filter’ link to easily reset the filter. Change <a href=”http://www.YourSite.com/YourView”>Clear Filter</a> to the URL of your view.
The View
We will then add the following directly underneath in the Before Content section:
<script src="https://www.YourSite.Com/table-export.js"></script>

<div style="overflow-x:auto;">
<table>
<thead>
<tr>
<th>Employee Name</th><td>[first_name] [last_name]</td>
<th>Department</th><td>[user_meta key=description]</td>
<th>Week beginning</th><td colspan="2">[get param="start_date"]</td>
</tr>
<tr style="visibility: hidden;"><td colspan="7"></td></tr>
<tr>
<th class="dateFormat-dd/mm/yyyy">Date</th>
<th>Start Time</th>
<th>Lunch</th>
<th>End Time</th>
<th>Hours Worked</th>
<th>AL?</th>
<th>Actions</th>
</tr>
</thead>
At the top of this snippet, we have imported a script which will allow us to export the table contents as a CSV on the front end. We will cover this later on in the tutorial. However, you can read more about how to do this in our guide HERE.
Then in the main content of the view we will add the following:
<tr>
<td>[if 606 equals="Yes"]<span style="color: #e03c83;">[546 format="d/m/y"]</span>[/if 606][if 606 not_equal="Yes"][546 format="d/m/y"][/if 606]</td>
<td>[if 606 equals="Yes"]<span style="color: #e03c83;">[541]</span>[/if 606][if 606 not_equal="Yes"][541][/if 606]</td>
<td>[if 606 equals="Yes"]<span style="color: #e03c83;">[543]</span>[/if 606][if 606 not_equal="Yes"][543][/if 606]</td>
<td>[if 606 equals="Yes"]<span style="color: #e03c83;">[542]</span>[/if 606][if 606 not_equal="Yes"][542][/if 606]</td>
<td>[if 606 equals="Yes"]<span style="color: #e03c83;">[544]</span>[/if 606][if 606 not_equal="Yes"][544][/if 606]</td>
<td>[if 606 equals="Yes"]<span style="color: #e03c83;">[606]</span>[/if 606][if 606 not_equal="Yes"][606][/if 606]</td>
<td>[editlink location="front" label="Edit" page_id=7806] | [deletelink label="Delete"]</td>
</tr>
Replace the field ID’s with your own forms field ID’s as required.
Then in the ‘After Content’ section of the view we will add the following:
<tr style="visibility: hidden;"><td colspan="7"></td></tr>
</tfoot>
<tr>
<th></th>
<th></th>
<th></th>
<th style="text-align: right;">Total Hours:</th>
<th>[sum_544]</th>
<th colspan="2"></th>
</tr>
</tfoot>
</table>
</div>
Adding calculations
In order to calculate the total time worked for the numbers of rows on display in the table, we have created a new code snippet that will create a total of the hidden fields from Form 1 and add display them in a shortcode – [sum_544] – in the ‘After Content’ section of the view.
/* Calculate Total Time Worked */
add_filter('frm_after_display_content', 'add_view_total_to_after_content', 30, 4);
function add_view_total_to_after_content($after_content, $display, $show, $atts){
    if ( $display->ID == 7808 ) {//Change 7808 to the ID of your View
        $entries = $atts['entry_ids'];
        $total = 0;
        foreach($entries as $entry){
			{
				$current_value = FrmProEntriesController::get_field_value_shortcode(array( 'field_id' => 544, 'entry' => $entry ) );
				list($hour,$minute,$second) = explode(':', $current_value);
    			$seconds += $hour*3600;
    			$seconds += $minute*60;
    			$seconds += $second;
  			}
            if ( $current_value ) {
                $total += $current_value;
            }
        }
		$hours = floor($seconds/3600);
  		$seconds -= $hours*3600;
  		$minutes  = floor($seconds/60);
  		$seconds -= $minutes*60;
		$after_content = str_replace('[sum_544]', (sprintf('%02d:%02d:%02d', $hours, $minutes, $seconds)), $after_content);
    }
    return $after_content;
}
Change 7808 to the ID of your view and 544 to the ID of your hidden field in 2 places. This snippet will allow you to only total what is being displayed in the view and therefore will always display the correct total based on the filters being used.
Export to CSV
Lastly, we need to add a button which would allow the user to export the view table content into a CSV format.
Add this button to the After Content section, under the table html:
<div style="display: block; margin: 20px auto; width: fit-content;">
<button onclick="exportTableToCSV('TimeSheet_[get param="start_date"]_[get param="end_date"].csv')" class="nectar-button small see-through-2 has-icon" style="cursor: pointer; padding: 10px 33px; margin-top: 25px; visibility: visible; color: rgb(0, 0, 0); border-color: rgba(0, 0, 0, 0.75); background-color: transparent;" data-color-override="false" data-hover-color-override="false" data-hover-text-color-override="#ffffff"><span>DOWNLOAD TIMESHEET</span><i class="fa fa-download" style="color: rgb(255, 255, 255);"></i></button>
</div>
This button will then call the javascript required to export the table as described in Step 3 and also in our article HERE.
In the Advanced Settings section of our view we then have the following settings:
- Page size = 31 – This will allow us to show a maximum of 31 entries at any time which will be enough for any full month once the filters have been applied.
- Order > Date > Descending – Adjust as required.
- Filter Entries – We have 3 filters on our view:
- User ID is Equal to > Current User
- Date is Greater than or equal to > [ get param=”start_date” ]
- Date is Less than or equal to > [ get param=”end_date” ]
These settings, along with the filter form mentioned above, will allow you to filter your view based on any date range. If you require an admin only view to view all staff working hours, remove the User ID filter.
Step 4: Building your page
This step is obviously more down to personal preference and how you wish to display the information but in essence your page will need to contain:
[ formidable id=48 ] – The timesheet form
[ formidable id=49 ] – The filter / search form
[ display-frm-data id=7808 filter=limited ] – the view for displaying your data.
Putting all of this together will give you a working timesheet capable of filtering and displaying variable times and dates.
See an example below:

Summary
Hopefully this will help anyone who is thinking of using Formidable Pro to create staff timesheets and save you having to install another plugin.
If you liked this tutorial, visit our blog for more ways to improve your websites and workflow.
Enjoy.