
Share a form entry between multiple users: Formidable Forms
There may come a point where multiple users may need to share a form entry amongst them. In this guide you’ll learn how to build a form & view using Formidable Forms Pro which will achieve just this.
NB. This tutorial assumes you have a website built using WordPress.
Prerequisites:
- Formidable Forms Pro (some pro fields & views are required)
- Basic understanding of how Formidable Forms works
- Basic HTML/CSS knowledge preferable (but not essential)
Optional Extras:
- WP-Client – A WordPress plugin which helps manage clients registered on your website
The Problem
It can be important for users (or your clients) to share a form entry between them and you may come across a time where you may need to build a solution to meet these needs.
As an example, we have multiple clients that work in small teams of 2 – 6 people who require the ability for person A to login and start completing a form, save a draft or submit the form entry, and then for person B (or C, D etc) to log in, access the shared form entry and continue where their colleague left off.
All users need to be able to access the form at whatever stage it was last at (Saved or Submitted) and either continue where the last person left off, or update the submitted entry.
The Solution
We created a new field in each users profile that was common across teams and use this to filter the form entries within the view. This allows multiple users to be able to access and edit a single entry and therefore achieve the functionality we require.
The Set-up
Before we start building the form we need to make sure that each user has a field in their profile that is common across teams. We use the WP-Client Plugin to manage our clients which allows us to add custom fields to user profiles but you could use the default ‘Nickname’ field.
We created a field called ‘Client Business Name’ and added the name of the client to this field.
E.g. Company A, Company B, Company C etc. Each user from that company has to have the same company name in this field.
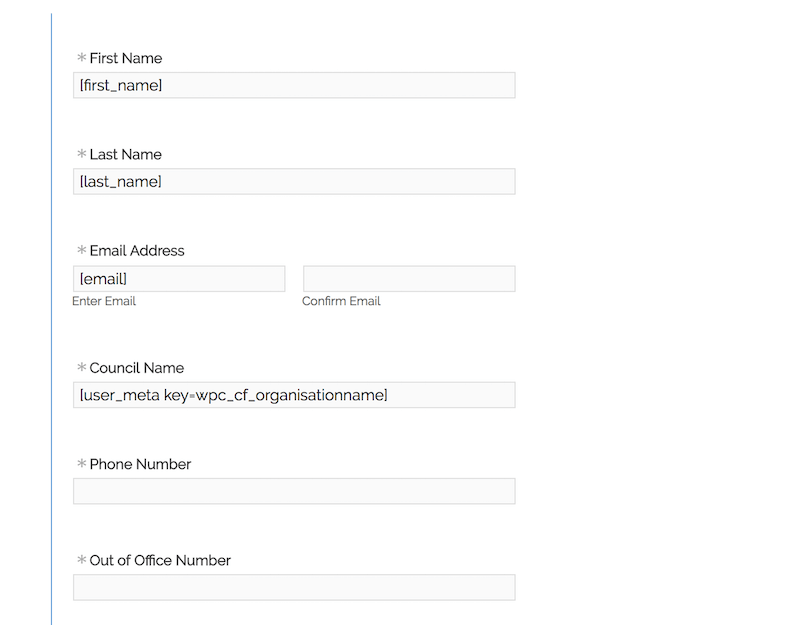
Share a form entry: The Form
The form itself is quite straightforward (other than it’s HUGE, spans several pages and contains hundreds of fields with conditional logic – hence the need to save it and return later to continue where you left off).
The first part of the form is the user details section and the majority of these fields use placeholders to save time on filling out the form and ensure the information captured is accurate.
In the ‘Customer Name’ field we use the following placeholder (but you could use [display_name] if you’re using the ‘Nickname’ field and have the display name set to display this option etc):
[ wpc_client_business_name ]Note: You could also set this is a hidden field or as ‘read-only’ to stop the client changing it and messing up the functionality.
Then you can just continue to build the rest of your form.
Form Settings
To enable front-end editing of a form you need to have the following settings enabled:
Permissions:
- Limit form visibility and submission to: Logged-in users
- Limit number of form entries to one per: Logged-in user
- Allow front-end editing of entries:
- Role required to edit one’s own entries: Logged-in user
- Role required to edit other users’ entries: Logged-in user
- On Update: Show message
- Allow logged-in users to save drafts = Ticked
Share a form entry: The View
The view settings can be seen in the attached screenshot and will be:
Basic Settings
- Use Entries from = the form you created in the previous step
- View Format = Both (Dynamic)
Advanced Settings
- Filter Entries = Customer Name > Is Equal to > [wpc_client_business_name]
- No entries message = “No saved entries found – Please contact us if you think this is incorrect”
Then we can start setting up the Listing Page & Details Page settings.
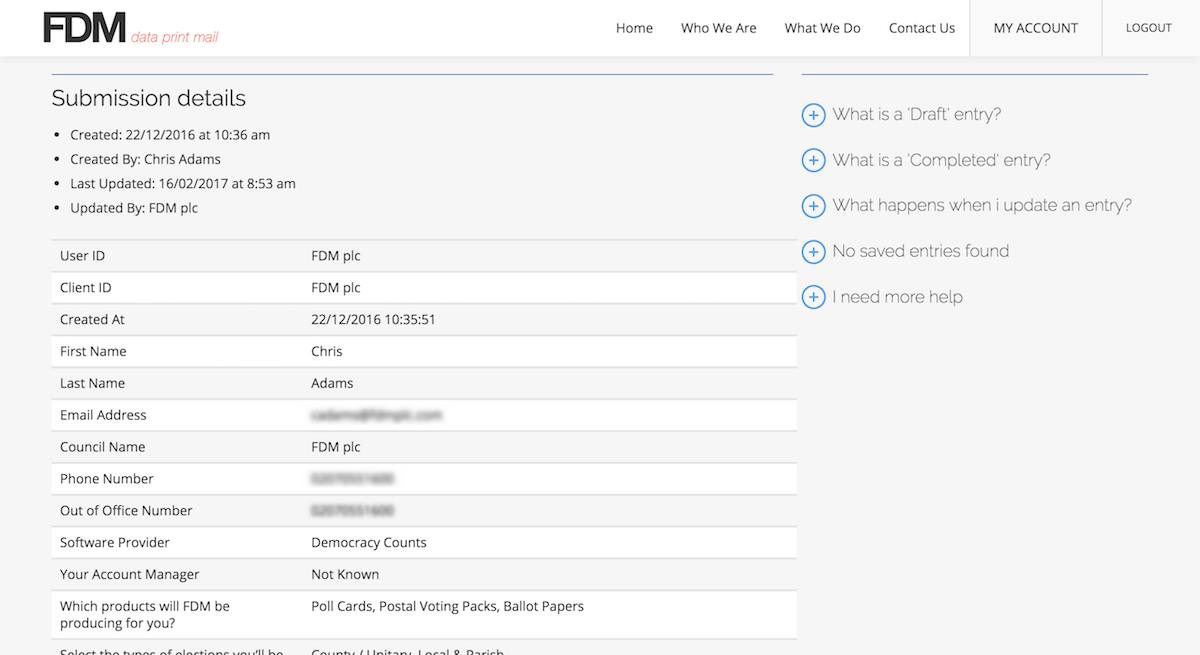
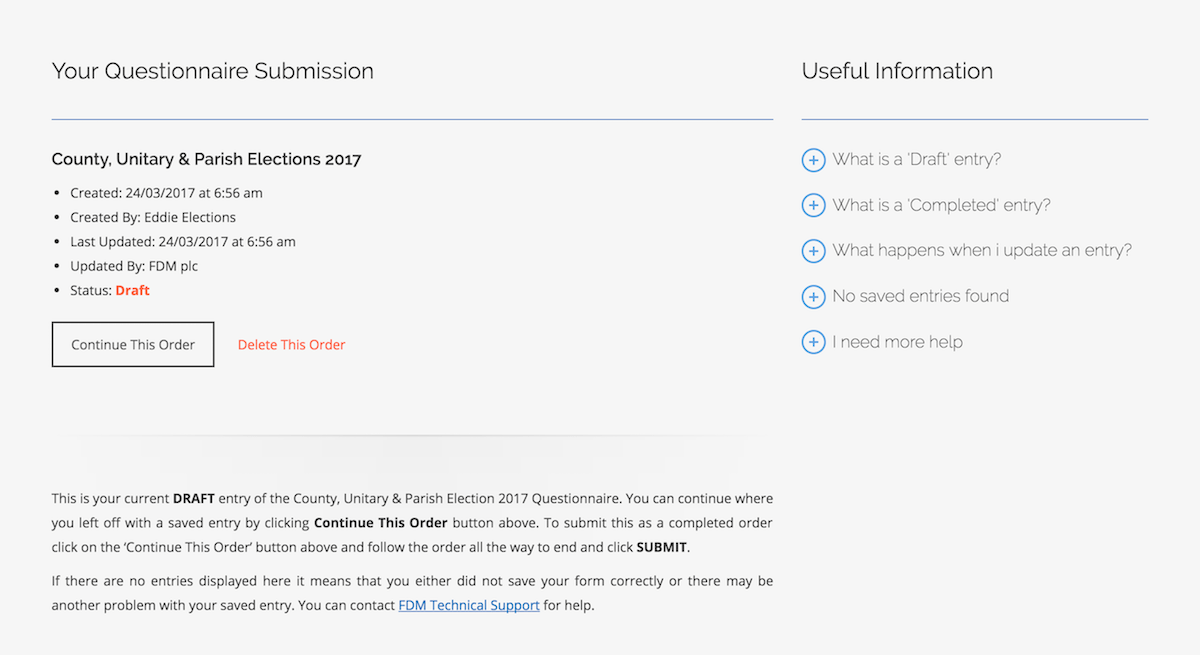
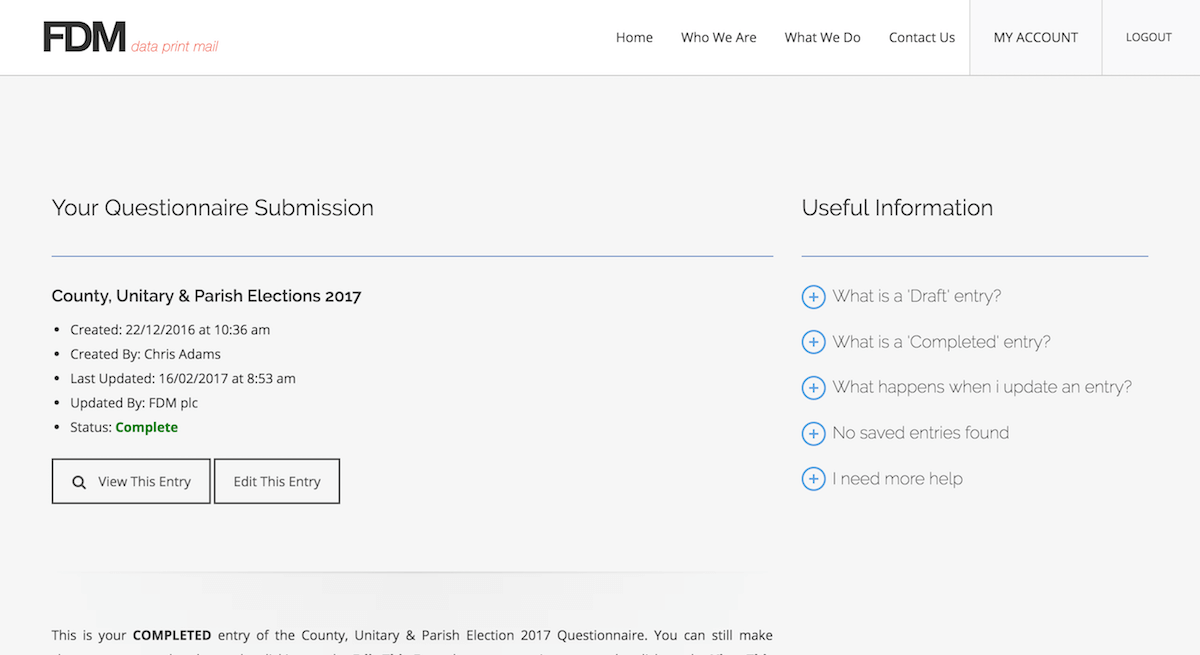
Listing Page
The listing page (or overview) will contain some basic details about the entry including who created it, when it was created and who updated it last. This is an important feature (for our client at least) to keep track of who has been updating the form . This also creates the accountability that should be required when allowing multiple people to edit a single entry.
It also contains some conditional logic messages based on the status of the entry (Draft or Submitted).
Before content:
<table class="tablesorter">
<thead>
<tr>
<th>Entry ID</th>
<th>Status</th>
<th>Client</th>
<th class="dateFormat-dd/mm/YYYY">Creation Date</th>
<th>Created By</th>
<th>Last Updated</th>
<th>Order Details</th>
</tr>
</thead>

<tbody>
Content:
<tr>
<td>[id]</td>
<td>[if is_draft equals="1"]<span style="color: tomato; font-weight: 700;">DRAFT</span>[/if is_draft][if is_draft equals="0"]<span style="color: green;">COMPLETED</span>[/if is_draft]</td>
<td>[4096]</td>
<td>[created-at format="d-m-Y"]</td>
<td>[4093] [4094]</td>
<td>[updated-at format="d-m-Y"]</td>
<td><a class="button" href="[detaillink]">VIEW</a></td>
</tr>
After content:
</tbody>
</table>
Details Page
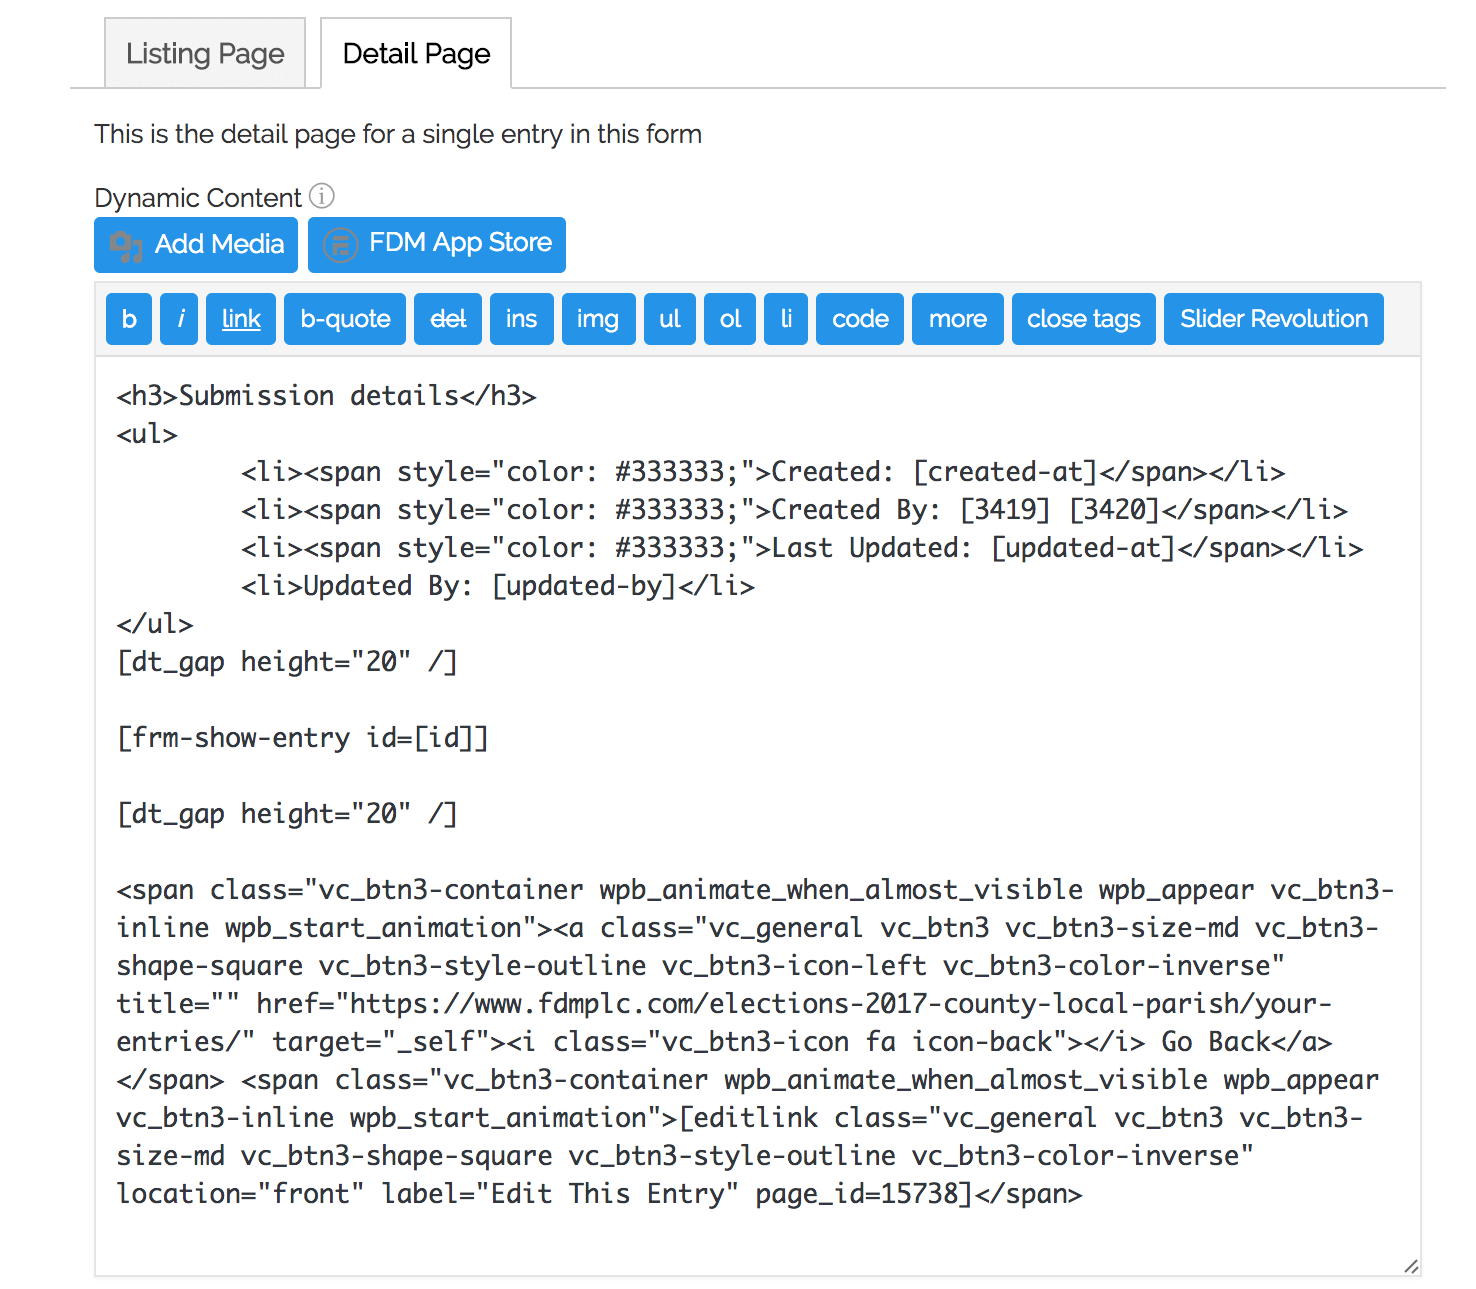
The details page is much more straight forward and essentially just displays the entry and then 2 buttons to easily allow the user to edit the entry if required.
The code for this page is:
<h3>Submission details</h3>

<ul>
  <li><span style="color: #333333;">Created: [created-at]</span></li>
  <li><span style="color: #333333;">Created By: [3419] [3420]</span></li>
  <li><span style="color: #333333;">Last Updated: [updated-at]</span></li>
  <li>Updated By: [updated-by]</li>
</ul>

<span class="vc_btn3-container wpb_animate_when_almost_visible wpb_appear vc_btn3-inline wpb_start_animation"><a class="vc_general vc_btn3 vc_btn3-size-md vc_btn3-shape-square vc_btn3-style-outline vc_btn3-icon-left vc_btn3-color-inverse" title="" href="https://www.yourwebsite.com/your-entries/" target="_self"><i class="vc_btn3-icon fa icon-back"></i> Go Back</a></span> <span class="vc_btn3-container wpb_animate_when_almost_visible wpb_appear vc_btn3-inline wpb_start_animation">[editlink class="vc_general vc_btn3 vc_btn3-size-md vc_btn3-shape-square vc_btn3-style-outline vc_btn3-color-inverse" location="front" label="Edit This Entry" page_id=15738]</span>


Summary
In summary the solution is quite simple. By creating a field in each users profile that contains a common entry (like a company name) then we can use this field to filter the view and allow any number of users from a single company to view, edit and update a form entry.
If you liked this tutorial, visit our blog for more ways to improve your websites and workflow.
Enjoy.